
How to Install WireGuard VPN on Ubuntu (Step-by-Step)
Hello! In this post, I’ll walk you through how to install a WireGuard VPN on Ubuntu—step by step. Don’t worry, I’ll keep everything as simple as possible.
Before we start, it’s best to provision a small VPS to host your WireGuard server—ideally from a provider that accepts crypto payments, such as servers.guru, cloudzy.com, or thundervm.com. Running the server on a VM on your personal computer typically won’t work unless you have a public IP and proper port forwarding in place.
basic VPS with 2 vCPU, 2 GB RAM, and a 20 GB SSD is more than enough.
Installing Wireguard
First, you need to update your system and install WireGuard. We’ll do this through the terminal.
Open your terminal
sudo apt update
sudo apt install wireguard
Generating Private and Public Keys
To secure your WireGuard VPN, we need to generate a private key and a public key.
Generating Private key :
wg genkey | sudo tee /etc/wireguard/private.key
To secure your private key run:
sudo chmod go= /etc/wireguard/private.key
To generate the corresponding public key, run:
sudo cat /etc/wireguard/private.key | wg pubkey | sudo tee /etc/wireguard/public.key
Creating the WireGuard Configuration File
Next, we’ll create the configuration file, which defines how WireGuard will operate on your server
sudo nano /etc/wireguard/wg0.conf
(insert example config snippet here)
Note: Postup ve preUp Values may change for your own server’s network interface
[Interface]
PrivateKey = <insert_your_base64_encoded_private_key_here>
Address = <server_ip_address>/24
ListenPort = 51820
SaveConfig = true

# Commands to run when the interface is brought up
PostUp = ufw route allow in on wg0 out on eth0
PostUp = iptables -t nat -I POSTROUTING -o eth0 -j MASQUERADE

# Commands to run when the interface is brought down
PreDown = ufw route delete allow in on wg0 out on eth0
PreDown = iptables -t nat -D POSTROUTING -o eth0 -j MASQUERADE
Note:
Here, eth0 refers to the network interface your server uses to communicate with the outside world.
To find the interface name on your system, run the following command in the terminal:
ip route list default
Enable IP Forwarding
For WireGuard VPN to function correctly, we need to enable IP forwarding on the server.
This allows the server to forward network traffic between the VPN clients and the internet.
In your terminal:
sudo nano /etc/sysctl.confAdd this config on sysctl.conf:
net.ipv4.ip_forward=1
Firewall (UFW) Rules
To enable wireguard communicating , here are the commands
Allow Wireguard Port:
sudo ufw allow 51820/udp
Activate SSH(To allow remote connection):
sudo ufw allow OpenSSH
Restart you firewall:
sudo ufw disable
sudo ufw enable
Starting Wireguard service
To enable and start wireguard service run following commands
sudo systemctl enable [email protected]
sudo systemctl start [email protected]
Congratulations! The server-side configuration is almost complete!
Installing WireGuard on the Client Side for the VPN
To connect to the VPN, you’ll need to configure the client (peer) in a few steps. First, you need to install WireGuard on the client device. There are two ways to do this:
GUI version: Download and install WireGuard’s graphical interface.
CLI version: Install via command-line interface, similar to how it was done on the server.
Generating Private and Public Keys
GUI users: Select “Add empty tunnel” to create a new configuration. This will automatically generate the private and public keys.
CLI users: Generate keys the same way you did on the server.
Client Configuration
Follow the steps below to set up the client configuration:
Add the following lines to your client configuration file:
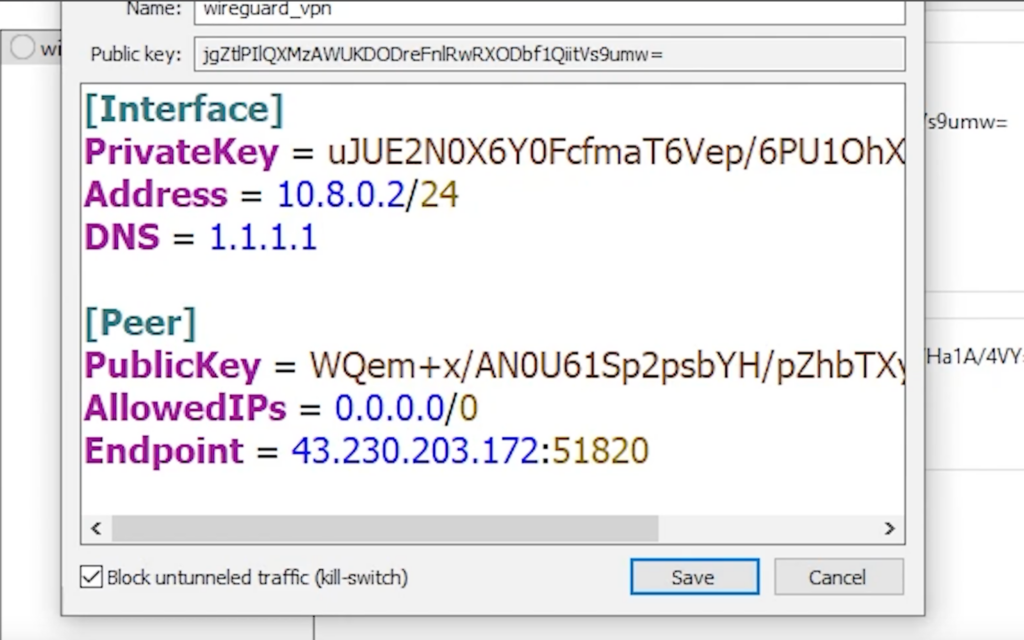
[Interface]
PrivateKey = <insert_your_base64_encoded_client_private_key_here>
Address = <client_ip_address>/24
DNS = 1.1.1.1

[Peer]
PublicKey = <insert_your_base64_encoded_server_public_key_here>
AllowedIPs = 0.0.0.0/0
Endpoint = <your_server_ip_address>:51820
If you are using GUI:
Not: Endpoint and Address values may change based on yout system
Adding the Client (Peer) to the Server
Finally, go back to your server and add the client (peer):
Sunucuda şu komutu çalıştırın:
Note: The IP address in the AllowedIPs field will vary depending on your setup.
sudo wg set wg0 peer <client_public_key_base64> allowed-ips 10.8.0.2

wg show
Starting VPN
To connect your peer to Vpn server:
GUI  “Activate” button.

CLI

sudo wg-quick up wg0
Your VPN connection is now active!
To verify, you can visit localhost.com or whatismyip.com to check your IP address and confirm that traffic is routing through the VPN.