What is a Reverse Proxy and Load Balancer?
In the early 2000s, as the internet became widespread, accessing websites meant directly communicating with the web servers hosting those sites. Web browsers would send requests to a web server, and the server would respond with web content. However, with the increasing complexity of modern application architectures and the shift toward microservices, managing the heavy traffic between clients and servers requires intermediate services. Among these services, load balancers, proxies, and reverse proxies are widely used.
What is a Reverse Proxy and Its Advantages?
A Reverse Proxy acts as an intermediary layer between clients and web servers, managing and filtering incoming traffic. This setup offers several advantages:
- Enhanced Security: It prevents clients from directly accessing the backend servers, adding an extra layer of protection.
- Traffic Filtering: Helps protect servers from malicious requests and optimizes traffic flow.
- Caching for Faster Responses: By serving cached content, it reduces server load and improves response times.
Using a reverse proxy is a common practice in cloud-native and enterprise environments to ensure scalability, security, and performance for web applications.
How to Set Up a Reverse Proxy?
A reverse proxy is a middleware solution that shapes and manages internet traffic between clients and backend servers. It acts as an intermediary layer, simplifying communication, optimizing performance, and improving security. On virtual servers, reverse proxies can be installed and configured to handle traffic efficiently.
The most popular reverse proxy solutions include:i:
APACHE
HAPROXY
NGINX
Important Note: These tools do not automatically function as reverse proxies upon installation. Their behavior depends entirely on how you configure their respective configuration files.
- If you want it to act as a reverse proxy, you must configure it to route client requests to backend servers.
- If you want it to act as a load balancer, you must set up rules to distribute traffic across multiple backend servers.
In short, the role a server plays—whether reverse proxy or load balancer—is determined entirely by its configuration, controlling traffic flow according to the intended purpose.
1. Install nginx:
sudo apt install nginx
2. Modify your nginx config file:
sudo vim /etc/nginx/sites-available/proxy.conf
Conf Example
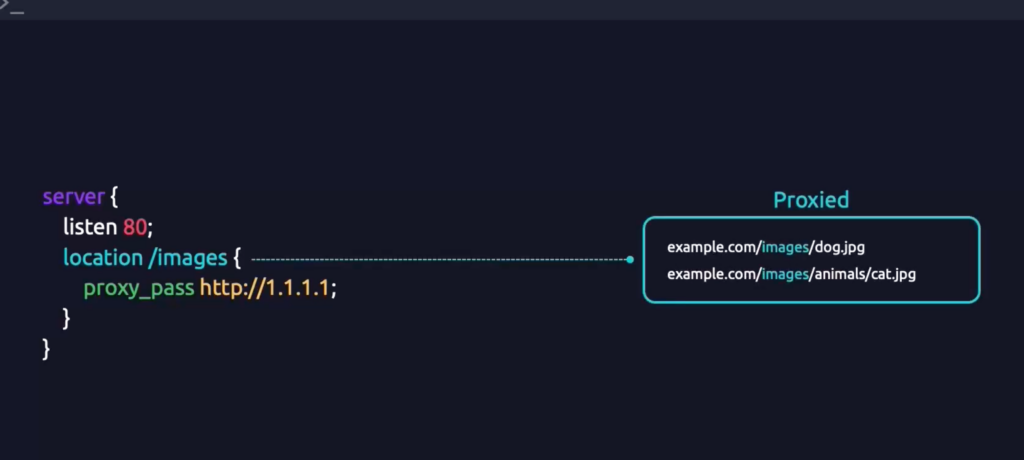
The following configuration sets up a reverse proxy that forwards all client requests to the /images path on your website to the backend server with IP address 1.1.1.1 (this is a sample IP address):
server {
listen 80;
location /images {
proxy_pass http://1.1.1.1;
include proxy_params;
}
}
Defining Proxy Parameters in NGINX
In NGINX, proxy configurations can be supported by a separate file called proxy_params. For example:
cat /etc/nginx/proxy_params
proxy_set_header Host $http_host;
proxy_set_header X-Real-IP $remote_addr;
proxy_set_header X-Forwarded-For $proxy_add_x_forwarded_for;
proxy_set_header X-Forwarded-Proto $scheme;
Initially, we created a configuration file at:
/etc/nginx/sites-available/proxy.confAs the directory name implies, this folder only stores all available site configurations. NGINX does not automatically activate or use these files. They are merely available configurations.
On the other hand, there is the /etc/nginx/sites-enabled directory.
- This directory contains active site configurations.
- Files here are usually linked to the corresponding files in /etc/nginx/sites-available via a symbolic link (symlink).
What is a symbolic link?
A symbolic link is a shortcut or pointer from one file to another. It allows you to reference a file in another location without duplicating its contents.
To activate a configuration in a real scenario, you need to create a symbolic link from your configuration file in /etc/nginx/sites-available to /etc/nginx/sites-enabled. Once the symlink is in place, NGINX will use this configuration for serving traffic.
After creating your reverse proxy configuration file in /etc/nginx/sites-available, you need to activate it by creating a symbolic link in the /etc/nginx/sites-enabled directory. Use the following command:
sudo ln -s /etc/nginx/sites-available/proxy.conf /etc/nginx/sites-enabled/
Before applying changes, it’s important to test your configuration to ensure there are no syntax errors:
sudo nginx -t
If the test is successful, you will see a “success” message indicating that NGINX can safely reload the configuration.
Once the configuration is verified, reload the NGINX service to apply your changes without restarting the server:
systemctl reload nginx.service
With these steps, your reverse proxy is now fully configured.
For more detailed documentation and ready-to-use configuration templates, visit the official NGINX resources:
man nginxIf you want to delete your conf file:
sudo rm /etc/nginx/sites-enables/proxy.conf
What is a Load Balancer and How is it Different from a Reverse Proxy?
A load balancer works similarly to a reverse proxy, but the key difference is that it can distribute incoming traffic across multiple servers.

For example, when a user request arrives, the load balancer can:
- Route it to the least busy server
- Distribute traffic based on server capacity using different load balancing algorithms
- Ensure high availability and prevent a single point of failure, which occurs when a system depends on one monolithic server
Ensure high availability and prevent a single point of failure, which occurs when a system depends on one monolithic server
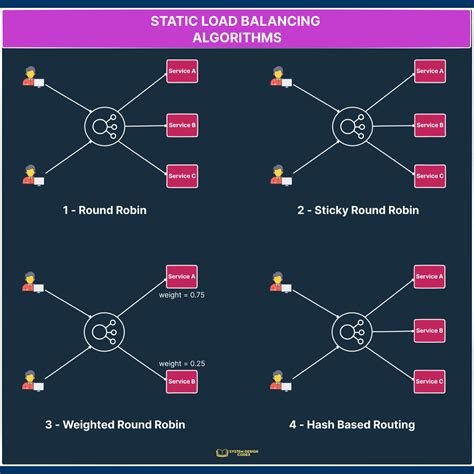
Load Balancing Methods
- Round Robin: Forwards requests to servers in a sequential order
- Least Connections: Routes traffic to the server with the fewest active connections
- Weighted Balancing: Assigns more traffic to powerful servers by applying weights
How to Set Up an Nginx Load Balancer
Load balancing is a crucial component of modern web architecture. By distributing incoming traffic across multiple backend servers, we ensure high availability, scalability, and better performance. In this tutorial, we’ll configure an Nginx load balancer with real-world examples.
Create the Configuration File
sudo vim /etc/nginx/sites-available/lb.conf
Once the Vim editor opens, let’s begin writing our load balancer configuration.
Suppose we have three different backend servers and want to balance requests across them. Using the upstream directive, we define a pool of servers:
Least Connections (least_conn)
If you want Nginx to forward traffic to the server with the least number of active connections
Weighted Load Balancing (weight)
Sometimes one server may have more resources (CPU, RAM, bandwidth). To forward more requests to a stronger server, use the weight parameter.
By default, the weight value is 1. If we set it to 3, it means server 1.2.3.4 will get more requests compared to the others:
Server Maintenance (down)
When putting a server in maintenance mode, mark it as down. This ensures Nginx won’t forward any requests to it:
Backup Server (backup)
If two main servers (1.2.3.4 and 5.6.7.8) go down, you can configure a backup server that only becomes active when all primary servers fail:
upstream mywebservers{

   least_conn;

server 1.2.3.4:8081 weight=3 down;

server 5.6.7.8 weight= 1;

server 10.20.30.40 backup;

}

server{

  listen 80;

  location /{

      proxy_pass http://mywebservers

}}
Sym link
sudo ln -s /etc/nginx/sites-available/lb.conf /etc/nginx/sties-neabled/lb.confTest it
sudo nginx -tReload the service
sudo systecmtl reload nginx.serviceWith this configuration, we’ve successfully set up an Nginx load balancer.
Down & Backup give flexibility for maintenance and failover.
Round Robin distributes traffic evenly.
Least Connections ensures better distribution when requests vary.
Weight allows us to prioritize stronger servers.
Advantages of a Load Balancer
Using an Nginx load balancer brings several benefits to your infrastructure:
- Flexibility: You can easily add or remove backend servers. The load balancer dynamically updates the backend pool.
- Performance: With load balancing algorithms (round robin, least connections, IP hash, etc.), system resources are utilized more efficiently, leading to faster response times.
- Fault Tolerance (Failover): If one or more servers go down, the remaining servers continue to serve traffic. This ensures high availability of your application.
- Scalability: As traffic grows, you can horizontally scale by adding more servers behind the load balancer.
- Redundancy: Using the backup directive, standby servers can automatically take over when primary servers fail, minimizing downtime.
- Security & Manageability: Load balancers can handle SSL termination, apply rate limiting, and provide a single entry point to manage and secure incoming traffic.