Docker 101 – Core Concepts and Practical Applications
In this article, we will explore how Docker provides advantages in application development and how to containerize an application using Docker. Once an application is written, we’ll learn how it can run on Docker with all its dependencies, and how it can be isolated from the host environment to ensure portability and consistent execution across different systems.
Why Docker?
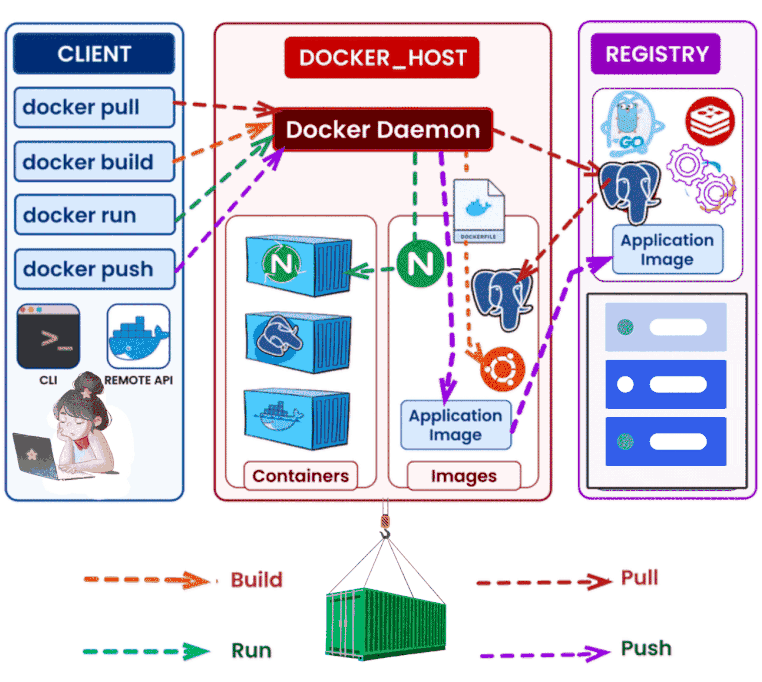
Docker commands are executed through the Docker CLI (Command Line Interface).
The Docker Client communicates with the Docker Daemon either through a UNIX socket or via a REST API over the network.
The Docker Daemon is responsible for building, running, and distributing containers independently of the client.
When a specific image is needed, the daemon fetches it from the Docker Registry, ensuring that the application has everything it needs to run consistently, no matter where it’s deployed.

In traditional deployment methods, applications are often designed as monolithic systems, requiring direct installation on virtual servers. During this process:
- The operating system, necessary libraries, and dependencies must be configured manually.
- Legacy monolithic applications were often transferred between servers via FTP.
- Once transferred, the applications frequently failed to run correctly on the new server because the environment was not designed for them.
This created significant delays in development, testing, and deployment, often due to miscommunication between developers and system administrators.
By understanding these challenges, it becomes clear why containerization tools like Docker provide faster, portable, and reliable deployment solutions.
Why Docker is a Game-Changer for Application Deployment
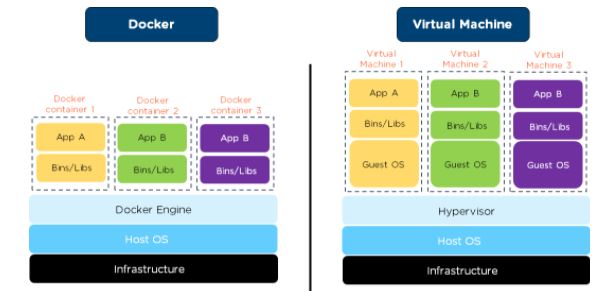
Docker packages an application along with all its dependencies into a container and provides operating system-level virtualization instead of hardware-level. This ensures 100% compatibility between the development environment and the production environment, which is a major competitive advantage.
Teams that can dockerize applications, test them in containers, and move them across environments are able to deploy applications faster and more reliably. Docker follows the principle of “Write Once, Run Anywhere,” ensuring consistent behavior across different platforms.
Dockerization refers to the process of creating, configuring, and distributing applications within Docker containers. Docker enables developers to package applications and dependencies into isolated, portable containers, providing consistent behavior across various environments. This containerization approach reduces deployment errors, improves scalability, and simplifies the workflow for both developers and operations teams.
Understanding Docker Architecture
To grasp Docker architecture, there are two core concepts you need to understand: Images and Containers.
Docker Images
A Docker image is a self-contained unit that includes your application code along with all its runtime dependencies. Think of a Docker image as a template used to create containers.
An image contains all the necessary libraries, dependencies, and files required for the container to run. Docker images are portable and shareable, which means you can distribute the same image across multiple environments, much like distributing a Windows .exe file for a game to run on different machines.
Docker Containers
A Docker container is a runtime instance of an image. When an image is launched as a container, it becomes a lightweight, isolated runtime environment.
Each container has its own filesystem, processes, and network stack, allowing multiple containers to run simultaneously on the same host without conflicts, all while sharing the same OS kernel. This isolation ensures consistency, security, and efficiency when deploying applications.
—————
The Docker Engine is the main software that creates and runs containers. It consists of two key components:
1-)Docker Daemon – Manages containers and images.
2-)Docker CLI (Command Line Interface) – Allows you to interact with Docker via terminal commands.
Docker Registry
A Docker Registry is a repository for storing Docker images. The most popular and widely used public registry is Docker Hub, which is free and open-source. Registries enable developers to share and distribute Docker images across different environments efficiently.
Dockerizing Applications: Definition and Benefits
Dockerizing refers to the process of building, configuring, and deploying applications inside Docker containers. It allows developers to package their applications and dependencies into isolated, portable containers, ensuring consistent behavior across development, testing, and production environments.
Dockerizing involves transforming an application and all its components—including code, runtime, system tools, libraries, and configurations—into a Docker image that contains everything needed for the application to run.
Dockerfile: Building Your Image
A Dockerfile is a text file containing instructions for creating a Docker image. It defines all the steps, dependencies, and configurations your application needs to run. Essentially, it’s the blueprint for building your application’s containerized environment.
Docker Compose: Managing Multi-Container Applications
Docker Compose is a tool for running multiple containers together. The docker-compose.yml file contains configuration details for multiple Docker containers, including services, networks, volumes, and other settings.
With Docker Compose, you can start and manage multiple containers with a single command, simplifying complex deployments.
Step-by-Step: Deploying Two Applications with Docker
Wordpress
The best way to truly learn Docker is hands-on, and WordPress is a perfect candidate. In this tutorial, we’ll deploy WordPress inside a containerized environment, treating it like a Cloud-Native microservices application. We’ll separate the application from the database and set everything up from scratch in Docker.
Prerequisites
- Windows or Mac Users: Install Docker Desktop to get both Docker Engine and a user-friendly interface.
- Linux Users: Follow the official Docker installation guide for your distribution.
Why This Project Matters
Working with WordPress in a containerized environment will help you understand key Docker concepts that go beyond this single project:
- Docker Volumes: Persist data outside of containers to prevent data loss.
- Container Networking: How containers communicate with each other in an isolated environment.
- depends_on: Control service startup order and dependencies.
- Restart Policies (on-failure): Ensure containers automatically restart if they fail.
By completing this project, you’ll not only have a fully functional WordPress setup in Docker but also gain practical skills to deploy any application using containerization principles.
3 files needed and for wp-config.php file you can dowload from wordpress
📁 Dockerfile
📁 docker-compose.yml
📁 wp-config.php
What We’re Going to Do
In this step, we’ll set up a containerized WordPress environment using Docker and Docker Compose. Here’s the plan:
- Custom Dockerfile for WordPress: We’ll use the official wordpress:latest image as the base and create a custom Dockerfile if needed.
- Database Setup: The database container will use mysql:5.7.
- Docker Compose Orchestration: Both containers (WordPress and MySQL) will be launched together using a single docker-compose.yml file.
- Container Networking: We’ll create a dedicated virtual network so the WordPress container and MySQL container can communicate securely.
- Persistent Data with Volumes: Docker volumes will be used to persist database and WordPress data, ensuring data isn’t lost if containers are restarted or recreated.
- Integrating wp-config.php: We’ll mount the wp-config.php file into the WordPress container with proper permissions, ensuring the application runs securely and correctly.
wp-config.php
<?php
define( 'DB_NAME', 'wordpress' );
define( 'DB_USER', 'wordpress' );
define( 'DB_PASSWORD', 'wordpress' );
define( 'DB_HOST', 'my-awesome-database:3306' ); // container adı
üzerinden erişim

define( 'DB_CHARSET', 'utf8' );
define( 'DB_COLLATE', '' );
$table_prefix = 'wp_';
define( 'WP_DEBUG', false );

if ( ! defined( 'ABSPATH' ) ) {
    define( 'ABSPATH', __DIR__ . '/' );
}
require_once ABSPATH . 'wp-settings.php';
Writing Dockerfile for wordpress
# imaj çekiyoruz
FROM wordpress:latest

# wp-config.php kopyalıyoruz
COPY wp-config.php /var/www/html/wp-config.php

# Gerekli izinleri ver
RUN chown www-data:www-data /var/www/html/wp-config.php
compose yaml wordpress and mysql db
version: "3.8"

services:
  my-awesome-database:
    image: mysql:5.7
    container_name: my-awesome-database
    restart: on-failure
    environment:
      MYSQL_DATABASE: wordpress
      MYSQL_USER: wordpress
      MYSQL_PASSWORD: wordpress
      MYSQL_ROOT_PASSWORD: rootpassword
    volumes:
      - mysql:/var/lib/mysql
    networks:
      - my-awesome-network

  my-awesome-wordpress:
    build: .
    container_name: my-awesome-wordpress
    restart: on-failure
    ports:
      - "8080:80"
    depends_on:
      - my-awesome-database
    networks:
      - my-awesome-network
    volumes:
      - wordpress:/var/www/html

volumes:
  mysql:
  wordpress:

networks:
  my-awesome-network:
    driver: bridge
Built it in your terminal
docker-compose up -d --build>> http://localhost:8080
Tier Blog Application with Docker: Nginx, Go, and MariaDB
If you are using Windows or Mac, you can install Docker Desktop from Docker Desktop Documentation. This provides both the Docker Engine and a user-friendly interface to manage containers.
For Linux environments, follow the official Docker installation instructions for your distribution.
In this tutorial, we’ll dockerize a 3-tier application built with Nginx, Go, and MariaDB, build images, and run containers locally for testing.
1.Clone the Application Repository
git clone https://github.com/kocdeniz/dockerize-tutorial.git2. Navigate into the project directory:
cd dockerize-tutorialYou now have all the files needed for the Nginx-Go-MariaDB example, including:
- Docker Compose configuration: compose.yaml
- Golang application code: backend/
- Nginx configuration: proxy/
- MySQL setup files: db/
Understanding the Dockerfile
Dockerfiles define how Docker images are built. Key instructions include:
CMD: Defines the default command to run
FROM: Specifies the base image
RUN: Executes commands in the image
WORKDIR: Sets the working directory
EXPOSE: Declares which ports the container will listen on
COPY: Copies files into the container
Example from our Golang backend:
FROM --platform=$BUILDPLATFORM golang:1.18-alpine AS builder
Uses the golang:1.18-alpine image
Initiates a builder stage for compiling Go code
$BUILDPLATFORM ensures platform-independent builds
File Architecture
├── backend
│ ├── Dockerfile
│ ├── go.mod
│ ├── go.sum
│ └── main.go
├── db
│ └── password.txt
├── compose.yaml
├── proxy
│ └── nginx.conf
└── README.md
The compose.yaml file defines three main services:
- backend – Go application
- db – MariaDB/PostgreSQL database
- proxy – Nginx web server
services:
backend:
build:
context: backend
target: builder
…
db:
image: postgres
…
proxy:
image: nginx
volumes:
– type: bind
source: ./proxy/nginx.conf
target: /etc/nginx/conf.d/default.conf
read_only: true
ports:
– 80:80
…
Run all services in detached mode:
docker compose up -dThis command will:
- Pull required images
- Build containers for the backend and proxy
- Start all services in the background
Check running containers:
docker compose ps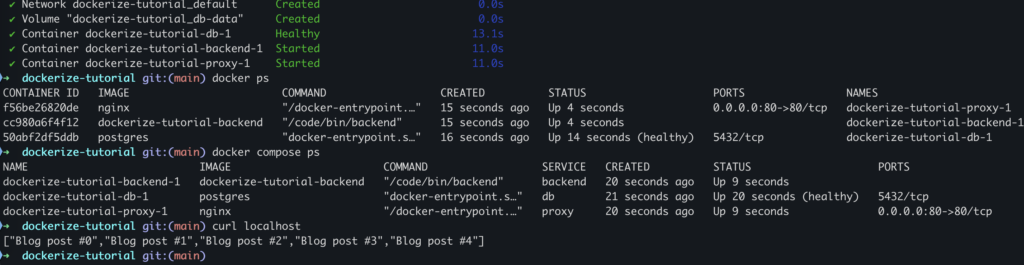
Open your browser and navigate to:
http://localhost/
You should see your 3-tier application running, powered by Nginx, Go, and MariaDB.
Conclusion
By dockerizing the application:
- We created isolated, portable containers for each service
- Simplified deployment and local development
- Ensured reproducibility across different environments
This approach mirrors cloud-native architecture, making your applications scalable, modular, and easy to maintain.